If your reading this article, you probably know Microsoft office. And you probably also know about Microsoft’s move to the cloud. Today I can tell you one of Microsoft’s competitors has made the same move, and its not Google.
LibreOffice is well known for its open source and free office solution unfortunately LibreOffice always needed to be installed on a Windows, Linux or MacOS operating system. Because of this it was not usable on Android, IOS and ChromeOS (and probably a number of other operating systems).
Around 2012 LibreOffice started a side project to solve this issue once and for all. This project aimed to run LibreOffice in a webbrowser, enabling all devices with a webbrowser to use this amazing piece of software.
Unfortunately this project was abandoned somewhere along the way and this amazing software never saw the light of day. And with the death of the LibreOffice web project the dream for real productivity where you are the owner of your own data also died, or so I thought.
Recently (a couple of months back but I did not have time to try it sooner) I discovered Collabora CODE. Collabora is a company which created a webbased LibreOffice, and found some spare time to integrate there product with a number of other applications. One of those applications is Nextcloud.
In this article I will outline the steps needed to install your very own Collabora CODE installation (with LetsEncrypt) and integrate this installation with Nextcloud, all of this without using Docker.
As with the WeKan tutorial, I am using 2 Ubuntu 16.04 Servers. One with the Nextcloud installation (WEB) and the other one with the Collobara CODE installation (CODE). This setup differs a bit from the tutorial on the Collabora webpage, but I think it is better to have your services spread out over a number of servers, rather than have them all on one server. This approach will complicate things a little. Since I only have one public IP address available I will have to use a reverse proxy to make this setup work from outside my LAN.
So first of all we have to install Collabora CODE on the “CODE” server. For this part we simply follow the instructions From the Collabora page:
# import the signing key
$ apt-key adv --keyserver keyserver.ubuntu.com --recv-keys 0C54D189F4BA284D
# add the repository URL to /etc/apt/sources.list
$ echo 'deb https://www.collaboraoffice.com/repos/CollaboraOnline/CODE ./' >> /etc/apt/sources.list
# perform the installation
$ apt-get update && apt-get install loolwsd code-brand
When this is done we have to make sure the CODE box will communicate with the revere proxy over http (we have only one IP so no Certificates on the CODE box). And while where editing the Collabora CODE configuration we might as well make all the necessary changes.
On the CODE box, open the Collabora CODE configuration file:
$ sudo nano /etc/loolwsd/loolwsd.xml
And make the following changes:
<!-- First we set the hostname of the collabora server. Find the following line and change the "(your collabora url office.examle.com)" to your needs  -->
<server_name desc="Hostname:port of the server running loolwsd. If empty, it's derived from the request." type="string" default="">(your collabora url office.examle.com)</server_name>

<!-- Now find the  "<ssl desc="SSL settings">" part and edit the first 2 lines to reflect the below ones-->
<enable type="bool" default="true">false</enable>
<termination desc="Connection via proxy where loolwsd acts as working via https, but actually uses http." type="bool" default="true">true</termination>

<!-- Now we need to configure the backend document storage, Find the  "<storage desc="Backend storage">" part and add 2 rules to the "WOPI" part to allow your Nextcloud domain and the Nextcloud server IP to access to CODE box -->
<!-- Make shure you escape all "." with a "\" -->
<!-- the new rules must look like this (with your extual IP and dns names of course) -->
<host desc="Regex pattern of hostname to allow or deny." allow="true">nextcloud\.example\.com</host>
<host desc="Regex pattern of hostname to allow or deny." allow="true">192\.168\.x\.x</host>

<!-- Last but not least, add the web admin console login data to the config -->
<!-- find the "<admin_console desc="Web admin console settings.">" part and edit the following 2 lines to your needs -->
<username desc="The username of the admin console. Must be set.">(loginusername)</username>
<password desc="The password of the admin console. Must be set.">(supersecretpassword)</password>
Now restart the Collabora CODE service with the following command:
$ sudo service loolwsd restart
Now we move our attention to the WEB box. Here we will need to set up our reverse proxy, install the SSL certificates and make the CODE -> Nextcloud connection.
We will start with the reverse proxy (this part is almost the same as with the WeKan tutorial).
First we need to enable the Apache reverse proxy, SSL and header mods (if the are not enabled already).
$ sudo a2enmod proxy
$ sudo a2enmod proxy_http
$ sudo a2enmod headers
$ sudo a2enmod ssl
$ sudo service apache2 restart
When this is done we will create a new virtual server config for the http version of the Collabora CODE installation, this virtual host will only be used for the Lets encrypt certificate validation, so int wont actually point to the Collabora CODE installation.
# first create a directory for the virtualhost and set the webserver user as owner
$ sudo mkdir /var/www/code
$ sudo chown www-data:www-data /var/www/code

# now create the site config
$ sudo nano /etc/apache2/sites-enabled/code.conf

# input the followin (change where needed)
<VirtualHost *:80>
    ServerAdmin <youre email address>
    DocumentRoot /var/www/code
    servername <website adres office.example.com>
    ErrorLog ${APACHE_LOG_DIR}/code_error.log
    CustomLog ${APACHE_LOG_DIR}/code_access.log combined
</VirtualHost>
Now we can run the Lets encrypt cert-bot and follow the instructions onscreen (if you don’t have cert-bot installed, you can install it by typing “sudo apt-get install certbot”):
$ sudo certbot
The Cert-bot wizard will have created a file named “code-le-ssl.conf”. Open this file with your favorite editor (I use nano) and edit it to reflect the following (make changes where needed):
<IfModule mod_ssl.c>
  <VirtualHost *:443>
    ServerName <youre_site_hostname>
    SSLEngine on
    SSLProxyEngine on
    ProxyPreserveHost on
    SSLCertificateFile /etc/letsencrypt/live/<youre_site_hostname>/fullchain.pem
    SSLCertificateKeyFile /etc/letsencrypt/live/<youre_site_hostname>/privkey.pem
    Include /etc/letsencrypt/options-ssl-apache.conf
    ProxyPass / http://<code_ip>:9980/
    ProxyPassReverse / http://<code_ip>:9980/
    Header always set Strict-Transport-Security "max-age=63072000; includeSubdomains;"
    <Proxy *>
      Order deny,allow
      Allow from all
    </Proxy>
    ServerAdmin <your_email>
    ErrorLog ${APACHE_LOG_DIR}/code_error.log
    CustomLog ${APACHE_LOG_DIR}/code_access.log combined
</VirtualHost>
</IfModule>
Now restart apache2 on the webserver:
$ sudo service apache2 restart
Because you wont be visiting the Collabora CODE installation manual it is not necessary to create a redirect for the http url.
We now have a Collabora CODE installation with LetsEncrypt certificate ready to go. All that left is to connect the Collabora CODE installation to the Nextcloud installation.
To Enable the link to Nextcloud we first have to install the Colabora online app in Nextcloud. This app can be found under “Office & text” in the applications section of your Nextcloud installation to enable this app click the Enable button. If the app is enabled it will look like the picture below

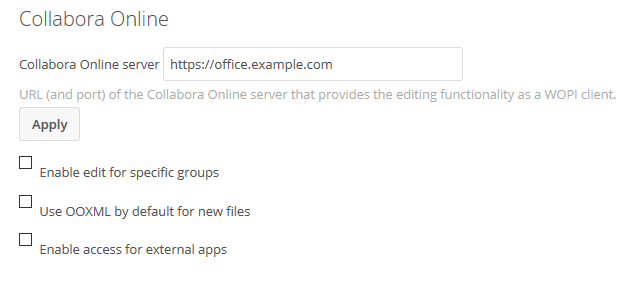
After enabling the app, an extra settings item will be added to the Nexcloud admin panel. Go to the Admin panel and click the “Collabora Online” menu item. Here You can add the external url to your Collabora CODE installation. This is the same URL we added to the Collabora CODE configuration (office.examle.com). This will look like the picture below:
If all went well, you will now be able to create and open most office files from your Nexcloud installation and edit them directly from your webbrowser.
Images by ColoboraOffice.